Introduction
If, like me, you are starting to move your Virtual Machines off those pesky laptops and Hyper-V servers that are sitting under your desk, and embracing The Cloud, then you might come across an interesting scenario.
Obviously, we don't want to leave 10's of Virtual Machines up and running in Azure because they will cost a LOT of money whilst sitting there consuming Compute Time whilst not doing anything productive.
Thank god, then, that Microsoft now lets us shut down our VMs and have them release the resources allocated to them so they don't generate bills for compute time whilst not running.
Note: If you shut the machine down from within the VM, it will NOT deallocate those resources, this only happens if you use the "Shutdown" icon in the Azure Portal.
So, what is the issue I was talking about?
The Scenario
When you shut down a Virtual Machine and restart it, the network adapter seems to get re-provisioned. So, any settings that you gave it (custom IP, DNS, etc) is lost and it gets set back to DHCP.
This is a problem when you have a Active Directory Virtual Machine running as this needs to be set as the DNS server of the Virtual Machines so it can do all it's AD type stuff (such as let you log on with an AD account!)
The first symptom of this scenario is a nice error message when you try to log on with an Active Directory account stating that the domain cannot be found!
So, you have to log on with your local user account, set the DNS and then you can log off and back on again with your domain account. What a pain!
The Solution
Aside to the, rather annoying, work around above, there is a simple solution.
Create a text file called "setDNS.cmd" and put the following into it:
:: Set primary and alternate DNS for IPv4 on Windows Server
:: 2000/2003/2008 & Windows XP/Vista/7
@ECHO OFF
SETLOCAL EnableDelayedExpansion

SET adapterName=

FOR /F "tokens=* delims=:" %%a IN ('IPCONFIG ^| FIND /I "ETHERNET ADAPTER"') DO (
    SET adapterName=%%a

    REM Removes "Ethernet adapter" from the front of the adapter name
    SET adapterName=!adapterName:~17!

    REM Removes the colon from the end of the adapter name
    SET adapterName=!adapterName:~0,-1!

    netsh interface ipv4 set dns name="!adapterName!" static 10.0.0.4 primary
)

ipconfig /flushdns

:EOF
Make sure to change the IP Address (near the end of the script) to the IP address of your Active Directory Virtual Machine.
Copy that file into the following folder:
C:\Windows\System32\GroupPolicy\Machine\Scripts\Startup\
Note: This is not my script, I found it here: http://superuser.com/questions/463096/change-dns-with-script
Now, log onto your Windows Azure Virtual Machine and load up the Local Group Policy Editor (in windows 8 / server 2012, just type "Group Policy" into the windows search and you should find it)
Navigate through to Computer Settings -> Windows Settings -> Scripts (Startup/Shutdown) -> Startup
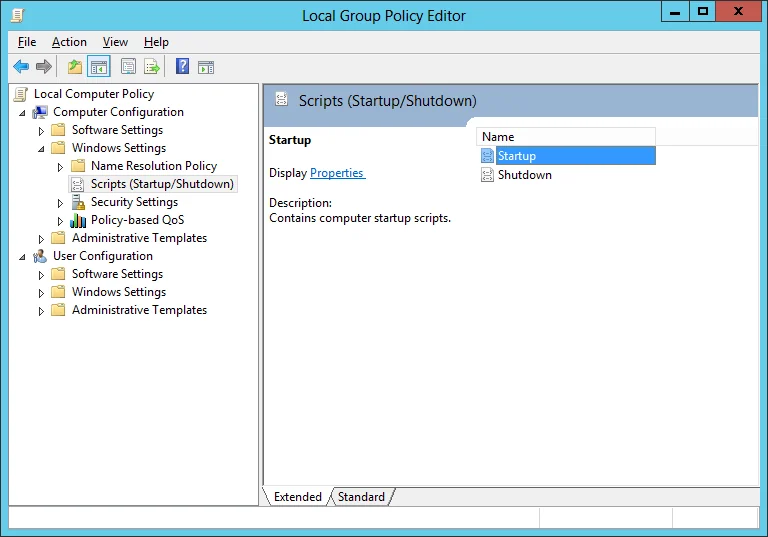
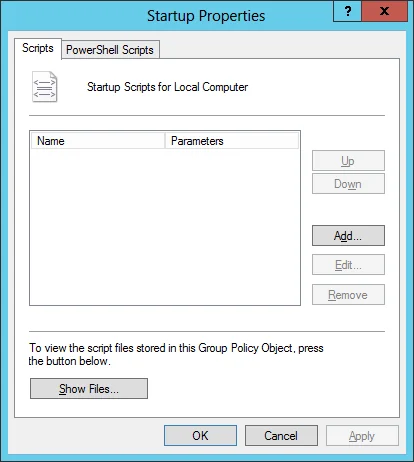
Click the Add button, then Browse and select the setDNS.cmd file you created earlier. You don't need to pass any parameters.
Save out all the windows and you are all set. Now, the next time that you reboot your Virtual Machine it will restart with the correct DNS servers set and you will be able to log straight in with your Active Directory Account.
Hope this helps.